LaserCube Academy · Intermediate
Connect, update and troubleshoot your Ultra MK2 or Pro
Eight short lessons on getting your cube connected and keeping it running: its own WiFi, your router or a network cable, what its screen tells you, firmware updates and a factory reset, plus power, heat and where to get help. Pass the final quiz and download your certificate.
Course contents0 of 8 lessons done
The questions, the final quiz and the certificate need JavaScript. Without it you can still read every lesson below.
Before you start
How this course works
This course is about what keeps your cube connected and up to date: the four connection modes, what the cube’s screen tells you, firmware updates and a factory reset. It ends with power, heat, and when to stop and contact us.
By the end you can
- choose the right connection for one cube, several cubes, or a place with busy WiFi;
- connect over the cube’s own WiFi, your router or a network cable, including a cable straight to a laptop;
- read the status bar and the Status Info page, and find out why a projection breaks up;
- update the firmware and do a factory reset;
- charge the cube correctly, keep it within its temperature range, and know when to stop using it and contact support.
How the lessons work
- Each lesson takes about 5 minutes, plus any video. It has the key points and a few questions, and most have a video or pictures. Get a question wrong? Pick another answer.
- Your progress is saved in this browser. There’s no account and nothing is sent to us. Clearing your browser data, or switching to another device, starts the course again.
- When all eight lessons are done, take the final quiz: 10 questions, 8 right to pass, as many tries as you need.
- Pass, then download your certificate as a PDF or an image.
Every rule from the Start here course applies whenever the laser is on: the beam block set before the show, every beam at least 3 m (10 ft) above people, every beam and where it lands in view of someone who can stop the laser, a main and a backup way to stop it, only people trained in laser safety at the controls, and never leaving a running laser unattended. If you haven’t done that course yet, start there.
Sources: the LaserCube Ultra MK2 & Pro manual, and our video tutorials. If a video and the manual differ, follow the manual.
Completed
Lesson 1 of 8
Choose a connection
The cube needs a network connection when something streams to it or controls it over the network: LaserOS and other show software, an Art‑Net desk, or the web apps in your browser. In Playlist, Visualizer and Laser Show mode it plays from its SD card, and a DMX desk has its own cable.
The four connection modes
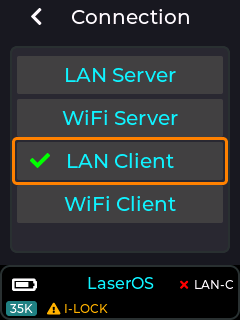
- WiFi server: the cube makes its own WiFi network, and your phone or computer joins it. The manual suggests it for one cube without cables, where WiFi isn’t congested (lesson 2).
- WiFi client: the cube joins your WiFi router. How well it works depends on the router, how congested the WiFi is and how much other traffic is on the network (lesson 2).
- LAN client: the cube joins your network through a network cable, to a router or a switch. The manual recommends it for several cubes, and where WiFi may be congested (lesson 3).
- LAN server: a cable straight to one device, such as a laptop, or a phone with the USB‑to‑LAN adapter that comes with the cube. The cube gives that device its network address (lesson 3).
Where to set it
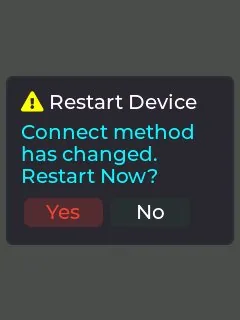
- Settings → Connection chooses the mode. The cube then has to restart: move the red cursor to Yes and push the knob.
- Settings → Network holds each mode’s own settings, such as network names, passwords and addresses. Cube Link is there too; it’s only available when the connection mode isn’t WiFi.
- Before you use any wireless mode, connect the WiFi antenna that comes with the cube.
- The status bar shows the connection mode, with a tick once it’s connected (lesson 4).
Check yourself
In the manual: Connection settings·Network settings·LaserOS control mode
Lesson complete. On to lesson 2.
Completed
Lesson 2 of 8
WiFi: the cube’s network or yours
Over WiFi, the cube either makes its own network (WiFi server) or joins yours (WiFi client). Both use the 2.4GHz band, which many other devices share.
WiFi server: the cube’s own network
- Connect the WiFi antenna, then choose Settings → Connection → WiFi Server.
- On your phone or computer, join the cube’s network. By default it’s called LaserCube and the password is Laser2020.
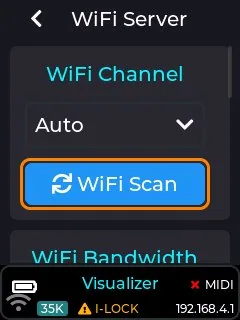
- Its settings are under Settings → Network → WiFi Server: network name (SSID), password, channel, bandwidth, IP address and net mask.
- Leave the channel on Auto: each time the cube is switched on, it then looks for the quietest WiFi channel.
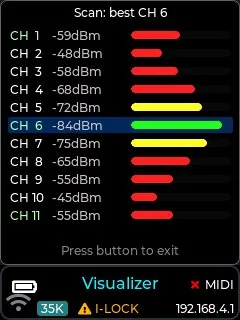
- The WiFi Scan button on that page shows how busy each 2.4GHz channel is, and picks the quietest one when the scan ends. It only works in WiFi server mode; in other modes it’s greyed out.
- A list that’s mostly red means too many other 2.4GHz devices are around, as in some apartment buildings. Then consider a cable instead, with the USB‑to‑LAN adapter (lesson 3). Outdoors, WiFi should be fine.
WiFi client: joining your router
- Under Settings → Network → WiFi Client, enter your router’s network name (SSID) and password. Then choose WiFi Client under Settings → Connection. Your phone or computer must be on the same router’s network.
- IP Mode Auto takes an address from the router. Static lets you type the IP address, the gateway (your router’s address) and the net mask (also called the subnet mask) yourself.
- To type a name or an address, highlight the box and short‑press the knob. Select the tick to close the box.
When WiFi quality matters
- Mostly in LaserOS mode: it streams the laser data over the network at a high rate, so a congested network shows as break‑ups in the projection.
- Playlist and Visualizer mode draw their content from the SD card, so WiFi quality shouldn’t affect their projection.
Check yourself
In the manual: WiFi server mode·WiFi client mode·LaserOS control mode
Lesson complete. On to lesson 3.
Completed
Lesson 3 of 8
Network cables and direct connections
A network cable avoids WiFi congestion. The cube’s network port takes a standard network (Ethernet) cable. A phone, tablet or laptop without a network port can use the USB‑to‑LAN adapter that comes with the cube.
LAN client: through a router or a switch
- The cube joins your network through the cable. The manual recommends this for several cubes, and where WiFi may be congested.
- Connected to your router, or to a switch that’s connected to it, the cube gets its address from the router, for example one starting 192.168.
- Under Settings → Network → LAN Client, IP Mode Auto IP takes an address from the router, or lets the cube give itself one when there’s no router (below). Static IP lets you type the IP address, net mask and gateway (the gateway is your router’s address).
A cable straight to one computer: two ways
- LAN client, with a self‑assigned address: with no router on the cable, nothing hands out addresses. After about 20 seconds the cube gives itself one starting 169.254 (an APIPA address; the manual’s diagram says to allow up to a minute). The status bar then shows A‑IP before the address, and a tick next to LAN‑C.
- Leave the computer’s network adapter on automatic (DHCP), not a fixed address: it gives itself a 169.254 address too, and the two then find each other. There’s no internet over this cable; that’s expected.
- LAN server: the cube gives the connected device its address. The manual recommends it for a direct cable to one device, such as a laptop, or a phone with the USB‑to‑LAN adapter. Its IP address and net mask are under Settings → Network → LAN Server.
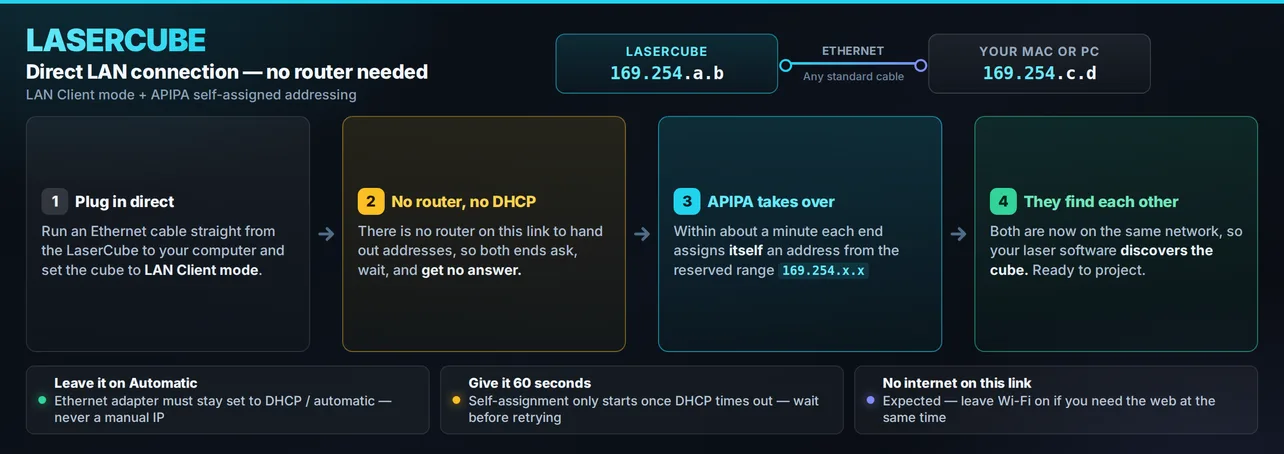
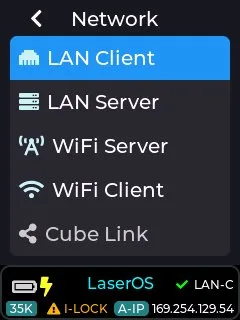
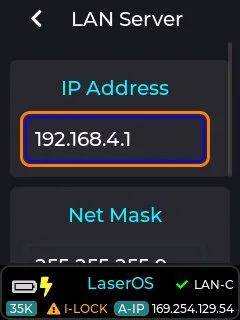
Both ways work for one computer on a cable.
Steps: LaserOS over a direct cable, in LAN client mode
For LAN client, the manual gives these steps:
- Turn off the computer’s WiFi for now, and close LaserOS if it’s running.
- Switch the cube on and connect the cable between the cube and the computer.
- Wait until the cube shows its 169.254 address.
- Start LaserOS and check that its Laser ON button isn’t greyed out: then LaserOS has found the cube.
- Turn the computer’s WiFi back on if you need the internet.
Check yourself
Put the manual’s steps for LaserOS over a direct cable (LAN client) in order.
- Turn off the computer’s WiFi and close LaserOS
- Switch the cube on and connect the cable to the computer
- Wait until the cube shows its 169.254 address
- Start LaserOS and check that Laser ON isn’t greyed out
- Turn the computer’s WiFi back on if you need the internet
LaserOS starts last, once the cube has its self‑assigned address. If the Laser ON button isn’t greyed out, LaserOS has found the cube.
In the manual: APIPA mode explained·LAN client mode·LAN server mode
Lesson complete. On to lesson 4.
Completed
Lesson 4 of 8
What the screen tells you
The status bar at the bottom of the cube’s screen gives you a quick overview of the cube, and shows important messages and warnings.
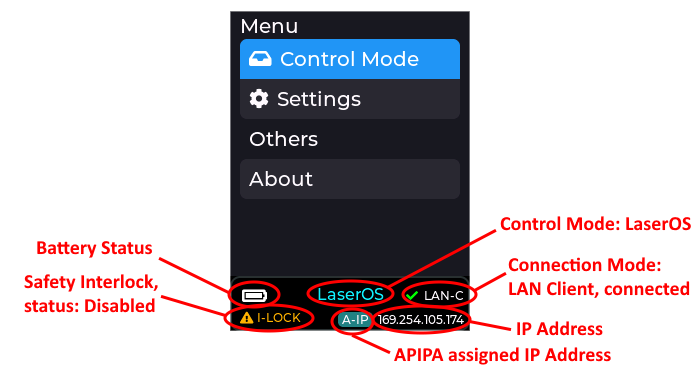
The status bar
- Battery: the battery gauge. With Battery Pct turned on (Settings → General), it also shows the percentage from time to time.
- I‑LOCK: a warning that the safety interlock is open (the manual’s picture says “disabled”), so the laser won’t emit (Start here, lesson 6).
- The control mode, such as LaserOS or Playlist.
- The connection mode, such as LAN‑C (LAN client), WiFi‑C (WiFi client) or WiFi‑S (WiFi server). A tick next to it means it’s connected; a red cross means it isn’t.
- The cube’s IP address, at the bottom right. A‑IP before it means a self‑assigned address (lesson 3). In Playlist and Visualizer mode, your browser opens the web app at this address (Control modes, lessons 3 and 4).
- The background colour: green while laser data arrives over the network, cyan while the ILDA input is in use (it overrides the current control mode), and purple on a Cube Link slave that has found its master.
Preview
Preview, in the main menu, shows a live picture of what the cube draws. It works for data arriving over the network and for the cube’s own content, not for the ILDA input. Settings → General sets it to 2D or 3D.
General and language settings
- Settings → General: the screen brightness, Battery Pct, the preview style (2D or 3D), and backward compatibility.
- Backward compatibility is only needed if you use older WiFi cubes and Ultra MK2 or Pro cubes on the same network with LaserOS. You also need LaserOS 0.17.7 or later.
- Settings → Language: 12 menu languages (English by default). Choosing another one restarts the cube. Some labels are shortened to fit the screen.
Check yourself
In the manual: CubeOS screen and status bar·General settings·Menu language
Lesson complete. On to lesson 5.
Completed
Lesson 5 of 8
The Status Info page
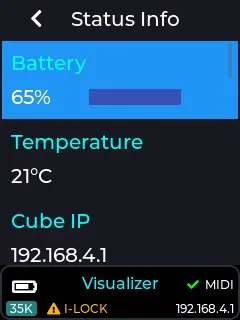
Status Info, in the main menu, shows what the cube’s hardware and network are doing: the battery, the data buffer, the SD card, and counters for data received and data lost.
What each line means
- Battery: an estimate of the charge, worked out from the battery’s voltage. While the cube projects, it moves around and reads a little lower as the image and output power change. While the cube charges, the charge can’t be measured.
- Remote Slaves: with Cube Link, how many slave cubes are connected.
- Buffer Free and Buffer Size: the free space in the cube’s data buffer, and the most it can hold.
- SD Card Capacity and SD Card Free: the card’s size and its free space, in gigabytes.
- PKT RX Events: data packets received. In LaserOS mode it climbs fast, as each packet of laser data arrives.
- DAC Empty Events: how often the buffer ran empty. Lost packets cause this, but so do disabling the interlock or choosing a test pattern.
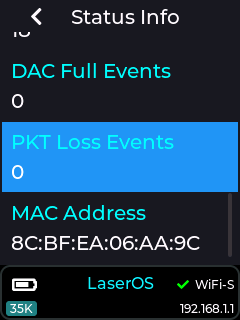
- DAC Full Events: how often the buffer overflowed.
- PKT Loss Events: lost data packets. They’re common over WiFi in congested places, and show as brief drop‑outs in the projection, on and off. Moving away from the congestion helps; a wired connection is better.
- MAC Address: unique to each cube.
- Select any of the four counters (PKT RX, DAC Empty, DAC Full, PKT Loss) to reset it to zero.
- The manual’s pictures also show Temperature, Cube IP, the name (Streaming Host) and address (Streaming IP) of the device streaming to it, and the number of Clients.
Check yourself
In the manual: Status Info page
Lesson complete. On to lesson 6.
Completed
Lesson 6 of 8
Not found, or breaking up
This lesson puts the first five together for two problems: LaserOS doesn’t find the cube, or the projection keeps breaking up.
LaserOS doesn’t find the cube
LaserOS finds connected cubes by itself. If its Laser ON button stays greyed out, it hasn’t found one. Check:
- The control mode: to stream from LaserOS, choose Control Mode → LaserOS.
- The connection: the status bar shows the connection mode you chose, with a tick, and an IP address (lesson 4). After changing the mode, the cube must restart.
- The same network: LaserOS finds cubes on the network your phone or computer is on. In WiFi client or LAN client mode with a router, both must be on that router’s network.
- WiFi modes: the WiFi antenna is connected. In WiFi server mode, your phone or computer has joined the cube’s network (LaserCube, unless you renamed it).
- A direct cable, LAN client: follow lesson 3’s steps: the computer’s WiFi off and LaserOS closed, the cube’s 169.254 address showing before you start LaserOS, and the computer’s network adapter on automatic.
- A direct cable, LAN server: the cube gives the computer its address, so leave the computer’s network adapter on automatic too.
- Older WiFi cubes on the same network: backward compatibility is on, with LaserOS 0.17.7 or later (lesson 4).
- LaserOS itself: the manual’s set‑up is for LaserOS 0.18.1 or later, from laseros.com.
The projection keeps breaking up
- In LaserOS mode, the laser data streams over the network at a high rate, so lost data packets show as brief drop‑outs.
- Look at Status Info: reset PKT Loss Events to zero, then see whether it climbs while you stream (lesson 5).
- In WiFi server mode, run WiFi Scan (lesson 2). If most channels are red, the area is congested.
- Move away from the congestion, or better, use a cable: the USB‑to‑LAN adapter to one device, or LAN client to a router or switch for several cubes (lesson 3).
- DAC Empty Events also climb when the interlock is disabled or a test pattern is chosen, not only when data is lost.
- Breaking up in Playlist, Visualizer or Laser Show mode shouldn’t be a WiFi problem: those play from the SD card. The manual warns that cheaper cards can fail to stream the laser shows, and names the Lexar A2 Silver Plus 64GB as the card it tested (Control modes, lesson 2).
Check yourself
In the manual: Using LaserOS·APIPA mode explained·Status Info page·SD card
Lesson complete. On to lesson 7.
Completed
Lesson 7 of 8
Firmware updates and factory reset
There are two ways to update the cube’s firmware. A factory reset puts the cube back to its factory firmware and settings; the manual says to do it only if it’s really necessary.
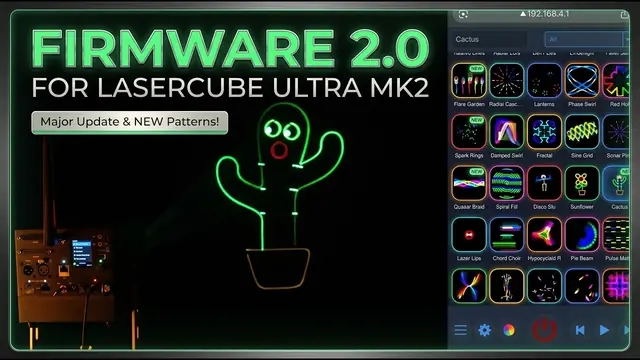
Two ways to update
- From the SD card, the manual’s preferred way: when the card has newer firmware, the cube asks whether to update. The latest card contents, with the newest firmware, are on GitHub. Unzip the download and copy its “Lasercube” folder to the root of the card. If the card already has a Lasercube folder, rename the old one first: deleting it also deletes your own playlists and MIDI mappings. Then put the card back in the cube and switch it on (Control modes, lesson 2).
- From LaserOS: when it finds newer firmware, it asks whether to update.
Factory reset
- Switch the cube off.
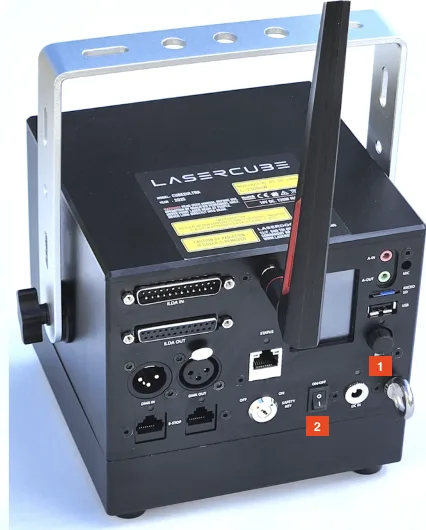
- Press and hold the knob below the screen (1).
- Still holding it, switch the cube on with the power switch (2).
- Keep holding the knob for at least 8 seconds, then let go.
- The cube goes back to its factory firmware version, and every setting goes back to its default.
- If the SD card has firmware newer than the factory version, the cube offers to update straight away. Say yes, so it runs the latest firmware.
Every setting is back to its default: your connection and network settings, and also the cube’s own projection settings (Settings → Projection, used in the cube’s own modes), including its safety zone. Before the next show, set them again and check the beam block, as in Start here, lesson 8. Power‑On Play is back on too (its default): in Playlist mode, the last playlist starts as soon as the interlock is enabled (Start here, lesson 6).
Check yourself
Put the factory reset in order.
- Switch the cube off
- Press and hold the knob
- Still holding it, switch the cube on
- Keep holding for at least 8 seconds, then let go
- Accept the update if the SD card offers newer firmware
Hold the knob while you switch on, keep holding for 8 seconds, and take the newer firmware from the SD card if the cube offers it.
In the manual: Firmware update·Factory reset·SD card
Lesson complete. On to lesson 8.
Completed
Lesson 8 of 8
Power, heat and getting help
The right charger, the right temperature, and knowing when to stop using the cube and contact us.
Charger and battery
- Every LaserCube comes with its 19V DC charger, with a plug or cable for your country. The charger plug is 2.5 × 5.5 mm. The Ultra MK2 and Pro 6W use a 120W charger, the Pro 3W a 65W charger. A 19V charger with a higher wattage is fine.
- Need a new charger? We recommend a generic 19V DC charger with that plug and at least that wattage, bought locally: shipping one from us usually costs more than the charger.
- The battery charges while the cube plays on its charger. On battery, the Ultra MK2 runs for 3–4 hours and the Pro for 2–3 hours. Charging takes about 4 hours for the Ultra MK2 and 3 for the Pro.
- If the battery needs replacing, we recommend a replacement under RMA (a repair return that support arranges) at our service centre: email support@laseros.com with your order number. Don’t open the cube to replace it yourself: the manual doesn’t allow servicing by the user, or opening or modifying the cube.
Heat
- Use the cube only between 10°C (50°F) and 40°C (104°F). Outside that range, the output can be weak, too strong or swing a lot, and extreme cold or heat will damage the laser diodes. The cube monitors its temperature, so we can tell if a failure was caused by temperature, and such failures aren’t covered by the warranty.
- Leave open space around all sides, so air can flow through the heat sink underneath.
- The manual doesn’t recommend running it for more than four hours at a stretch, and switching it on and off often shortens the diodes’ life.
- Temperature cut‑off: if the cube gets too hot, for example in strong sun, its temperature cut‑off stops it. It doesn’t restart by itself: you have to restart it.
Stop, and contact us
- Any smell or smoke: a LaserCube should never give off a smell. Unplug it right away, keep it away from anything flammable, don’t charge or use it again, and email support@laseros.com.
- A suspected defect of any kind, from manufacturing, damage or wear, or a broken manufacturer’s seal: don’t use the cube; contact us.
- Still not working after the checks in this course: email support@laseros.com. Don’t try to service, modify or fix the laser yourself. If it needs a repair, support tells you how to send it in.
Check yourself
Three situations. Is it OK to go ahead? Decide, then read why.
You’ve lost the charger of your Ultra MK2. A local shop has a 19V DC charger with a 2.5 × 5.5 mm plug, rated 150W.
The right voltage and plug, and a 19V charger with a higher wattage than the 120W original is fine.
Check the voltage, the plug and the wattage against the cube’s own charger.
Halfway through a show you notice a faint burning smell from the cube. The projection still looks fine, so you play to the end.
Any smell or smoke: unplug it right away, keep it away from anything flammable, don’t charge or use it again, and email support.
Should a LaserCube ever give off a smell?
The battery doesn’t last as long as it used to. You order a battery online and open the cube to fit it yourself.
Don’t open the cube yourself. We recommend a battery replacement under RMA at our service centre instead: email support@laseros.com with your order number.
Who may open or service the cube?
In the manual: Power, battery and temperature·Technical specifications·Safety guidelines
Lesson complete. Next: the final quiz.
Final quiz
Final quiz
10 questions picked at random, one from each of the course’s 10 topics. Get 8 right to pass. You can try as many times as you like.
Finish all eight lessons first. Still to do:
Certificate
Your certificate
Pass the final quiz to get your certificate. Go to the final quiz
Well done. Type your name as you want it on the certificate.
Your certificate is made right here in your browser. Your name isn’t sent anywhere; it’s only kept in this browser.

Download not starting? Press and hold the certificate (on a computer, right-click it) and save the image.
This is a certificate of completion. It is not a licence, a Laser Safety Officer (LSO) qualification or permission to run public laser shows. Every rule from Start here’s pre‑show checklist applies whenever the laser is on.
More courses: LaserCube Academy.