LaserCube Academy · Beginner
Start here: from the box to your first safe show
Ten short lessons for new LaserCube Ultra MK2 and Pro owners: why laser light is dangerous, a safe setup, the key, E‑Stop and safety zones, LaserOS and a checklist for every show. Pass the final quiz and download your certificate.
Course contents0 of 10 lessons done
The questions, the final quiz and the certificate need JavaScript. Without it you can still read every lesson below.
Before you start
How this course works
This course takes you from a new LaserCube to a safe first show. Most of it is about safety, because a Class 4 laser can blind someone in an instant.
- Each lesson has a video or pictures, the key points and a few questions. Get one wrong? Pick another answer.
- Your progress is saved in this browser. There’s no account and nothing is sent to us. Clearing your browser data, or switching to another device, starts the course again.
- When all ten lessons are done, take the final quiz: 10 questions, 8 right to pass, as many tries as you need.
- Pass, then download your certificate as a PDF or an image.
The LaserCube manual says the cube must only be operated by people trained in laser safety. This course teaches the basics. It doesn’t replace full laser safety training, or a Laser Safety Officer (LSO) where your local rules require one.
Sources: the LaserCube Ultra MK2 & Pro manual, and X‑Laser’s Laser Operator Basics Course, used with permission. X‑Laser is LaserCube’s authorised distributor in the USA.
Completed
Lesson 1 of 10
Know your LaserCube
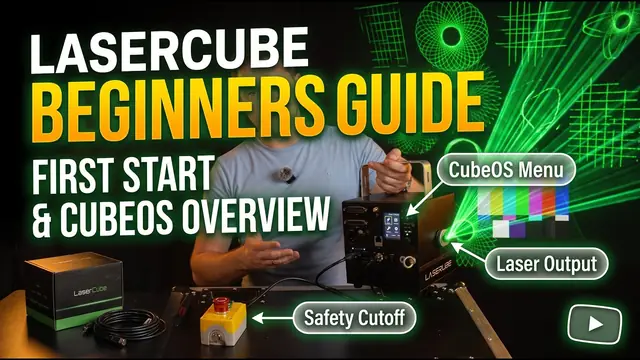
Before you switch anything on, learn what the parts on the back of your cube do. Most of them are there for safety.
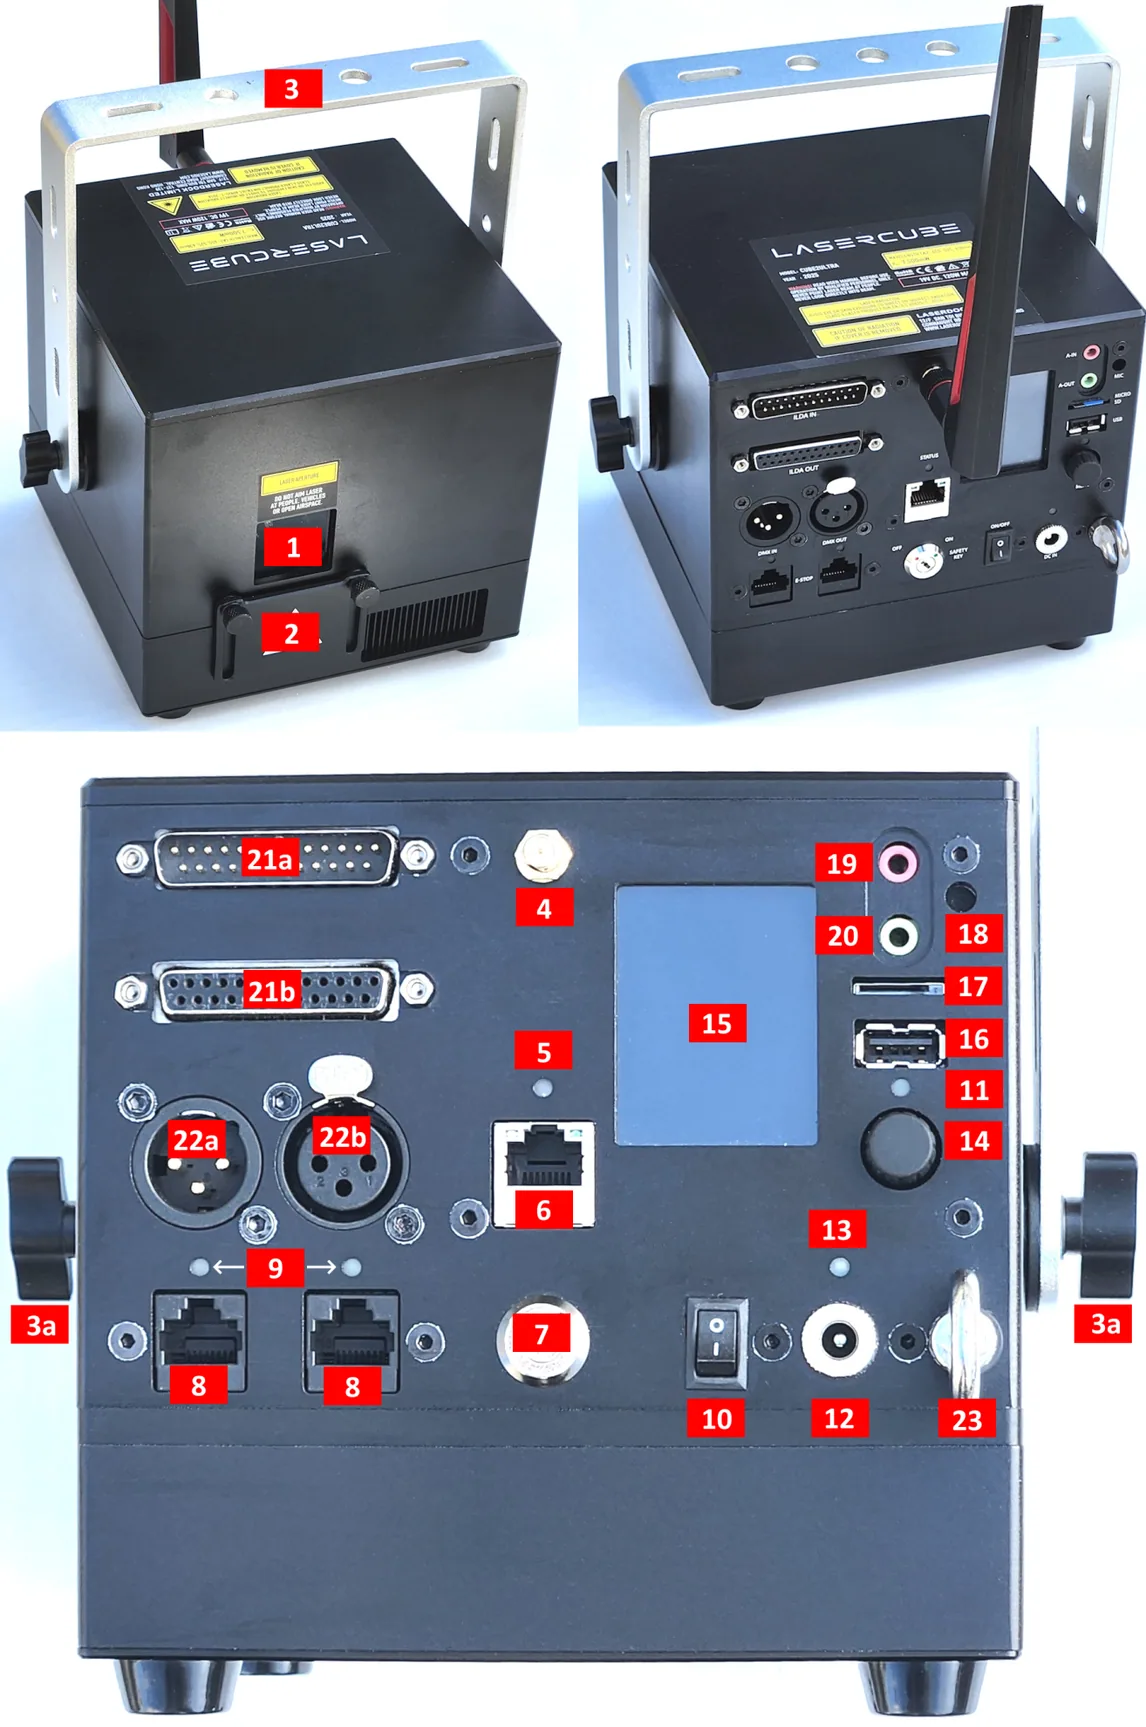
The parts that keep the beam safe
- Laser aperture: the window the laser light comes out of.
- Beam block: blocks the beam and stops it from scanning into the audience. The screws on either side lock it.
- Safety key: stops the laser from being switched on by accident. After a power loss, or when the interlock is opened and closed again, the key has to be reset.
- E‑STOP (interlock) ports: two RJ45 sockets for the safety shut‑off. The safety jumper or an E‑Stop plugs in here. Never plug network (Ethernet) devices into them.
- EMISSION LEDs: when they’re lit, the laser can emit. That doesn’t mean it is emitting right now, only that nothing stops it. Never cover them.
- Safety eye bolt: when the cube is mounted up high, a safety cable goes through it.
- Mounting bracket: for a secure installation. Screws lock the tilt.
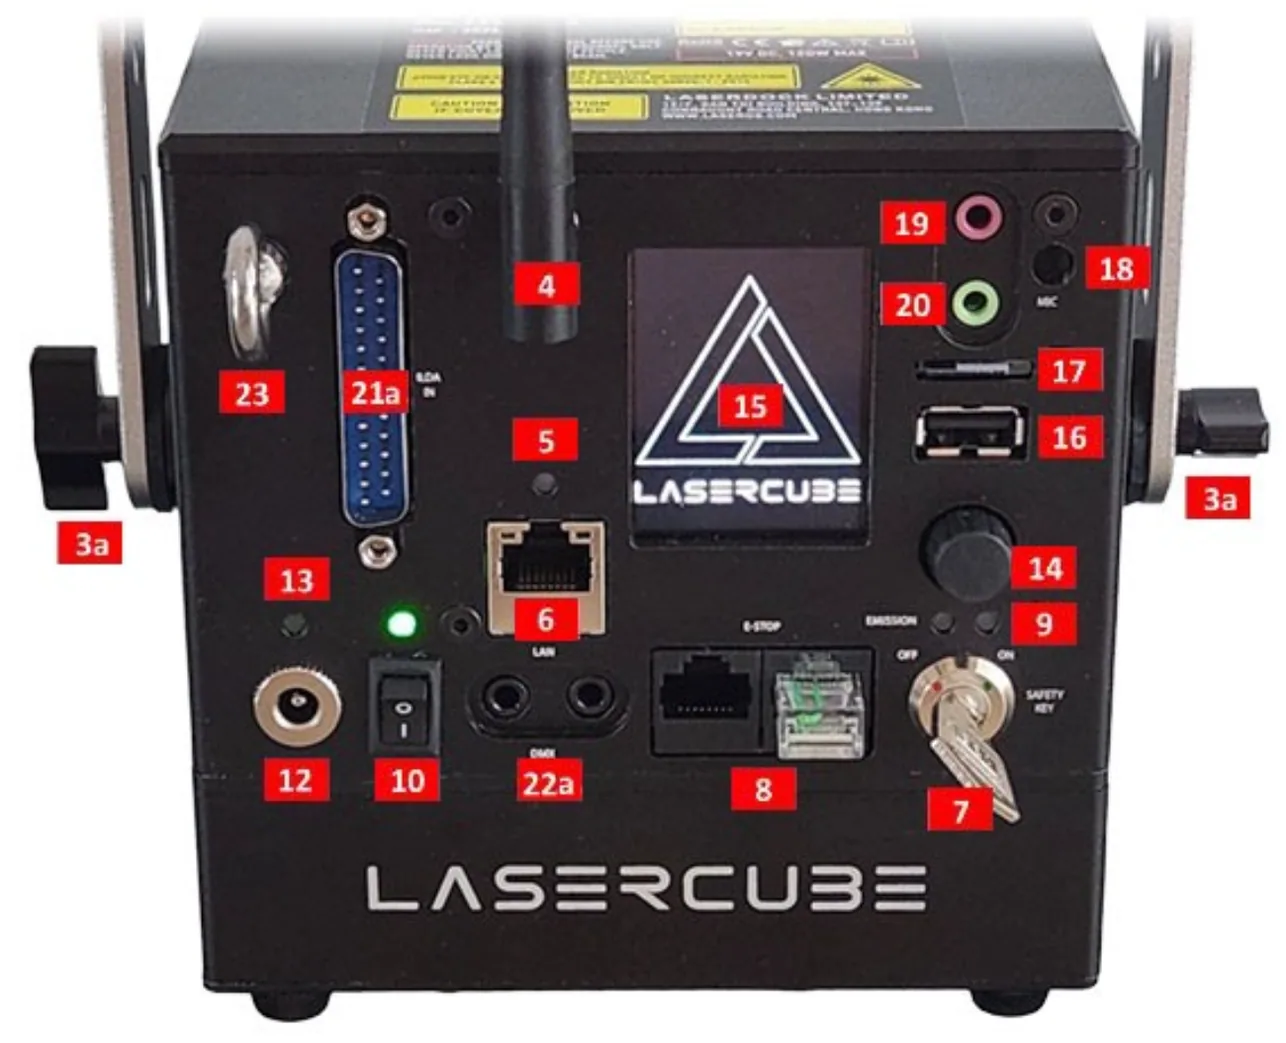
The rest of the back panel
The power switch and power LED; the 19V DC power input and its charging LED (red while charging, green when full); the LCD and rotary knob for CubeOS; the network (LAN) port; the WiFi antenna connector; a USB port for a MIDI controller; the microSD card slot; audio in and out; DMX in and out; and the ILDA ports.
The label
The label on your cube shows its model and laser power, and the warning CLASS 4 LASER PRODUCT. Keep every factory label on the cube and readable: they are required for legal compliance.
Check yourself
In the manual: Parts diagram·Product labelling
Lesson complete. On to lesson 2.
Completed
Lesson 2 of 10
Why laser light is different
A laser beam isn’t just bright light. This lesson explains why it can hurt someone when a much stronger stage light can’t.
The beam hardly spreads
Even a narrow stage light fans out by about half a degree. A laser beam can fan out by as little as 0.03 degrees, so it is still a tight spot full of energy long after it has left the cube.
Energy on a tiny spot: irradiance
How much energy lands on each bit of the beam’s area is called irradiance. Picture three lights that all use 20 watts. As an old filament bulb, 20 W makes a dim lamp. As an LED stage light, it makes a bright effect. As a laser, 20 W is an arena‑class projector. The power is identical; what changes is how tightly the light is squeezed together.
A beam that stands still is the most dangerous
Your LaserCube draws shapes by sweeping one beam very fast with tiny mirrors (scanners), and your eye blends the moving dot into a picture. Sweeping leaves the irradiance exactly as it was; what drops is the dose, because each spot only gets the beam for an instant. A single beam held still delivers everything to one spot, which makes it the riskiest output a laser has.
What it can do
- Eyes: in the dark your pupil opens to about 7 mm, wide enough for a whole beam to get in. The eye then focuses it onto the retina. One accidental exposure can cause instant, permanent blindness.
- Skin: a high‑power beam can cause burns.
- Fire: lasers can set things alight a long way from the cube. Shine a 2 W torch at a candle and the wick stays cold; hold a 2 W laser beam on it and it catches.
- Aircraft: a beam lights up a cockpit window and can distract a pilot or leave them briefly blinded, even many miles away.
- Lenses: camera sensors and video projectors can be wrecked by a beam for good, the same way an eye can.
Check yourself
Put these 20‑watt lights in order, from lowest to highest irradiance.
- Light bulb
- LED stage light
- Laser
All three use the same power; the laser squeezes it into the smallest spot, so its irradiance is far higher.
Lesson complete. On to lesson 3.
Completed
Lesson 3 of 10
The safety rules
These are the rules from the manual that matter most. Every later lesson builds on them.
Avoid eye or skin exposure to direct or scattered radiation. Eye exposure can cause instant injury and permanent blindness.
Never at people
- Never aim the laser at people or at shiny, reflective objects, and never let a beam be reflected toward people. Reflected (scattered) light can injure eyes too.
- Never scan the audience. The LaserCube is not made for audience scanning, whatever the setup.
- Don’t stand in front of the cube while it’s on. Wear laser safety glasses while rigging, servicing or otherwise working with it.
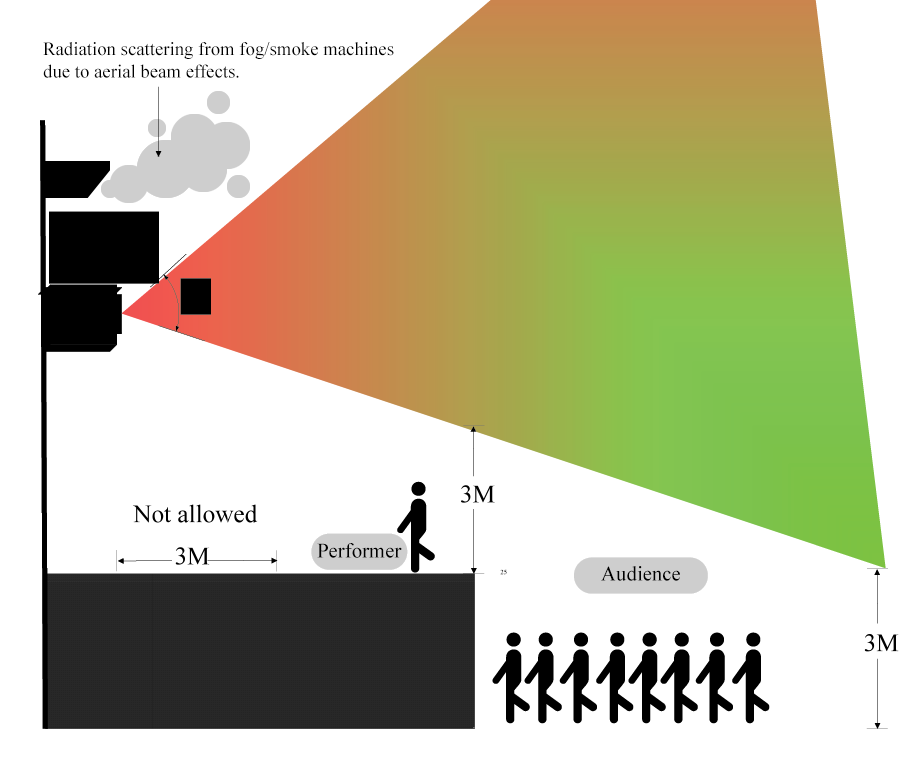
Keep beams 3 metres above people
Wherever people may be, every beam must stay at least 3 metres (10 feet) above the floor, measured from the highest place someone could stand: a raised floor, a stage, a balcony.
Split every venue into safe areas, where people are and no laser light may reach, directly or reflected, and restricted areas, where nobody may be. Keep a buffer of at least 3 metres between them on all sides. Every beam has to end in a restricted area.
Fire, aircraft and who may use it
- Lasers can start fires at great distances. Don’t use the cube near flammable materials.
- Never let a beam hit an aircraft or go into the open sky. In the US, shining a laser at an aircraft is a federal crime punishable by fines or jail.
- The LaserCube is not a toy. Keep it away from children and from anyone not trained to use it, before, during and after a show.
- Never leave a running laser unattended, even with other crew around.
- Don’t use the cube if you think it’s damaged or faulty, and never open or modify it. Email support@laseros.com instead.
- The only maintenance allowed: cleaning the aperture window and the vents, with the cube switched off and the key out.
Check yourself
In the manual: Safety warning·Safety guidelines
Lesson complete. On to lesson 4.
Completed
Lesson 4 of 10
Plan the projection area
Before you switch on, look at the room. Every beam has to end somewhere safe, and nothing it can reach should be a person, a reflection, a camera or anything that can burn.
Every beam must end on something
Laser beams travel a long way, so plan where each one stops: on a solid surface that doesn’t reflect and doesn’t burn.
Good places for beams to end
- A concrete or brick wall
- A projection screen
- Heavy, opaque, flame‑retardant fabric
- The cube’s own beam block
Never
- Mirrors, windows and glass
- Chandeliers, mirror balls, chrome, glossy panels
- Trees and bushes
- The open sky
Look for hazards
- Reflections: mirrors, glass, polished metal, mirror balls.
- Things that burn: curtains and fabric that aren’t flame‑retardant, decorations, and any pyrotechnics. Keep them out of the beam area.
- Lenses: cameras and video projectors. A beam can destroy their sensors, so keep beams away from them (lesson 8 shows how).
- Height: find the highest place anyone can stand, such as a stage, a raised floor or a balcony, and keep beams 3 m above it.
Watch the whole area
For the whole show, someone who can stop the laser must have every beam, and every spot where a beam lands, in sight. If part of the room is out of your view, for example where beams land behind your position, put a second person there with a stop of their own. If anyone gets near the beams, a crowd surfer for example, stop the laser at once.
Outdoors
Beams must still end on something: a building, a screen, a wall. Never point them into the open sky.
In the US: beams may only go into open airspace with FAA clearance. The request, FAA Form 7140‑1 (Notice of Proposed Outdoor Laser Operations), goes in several weeks ahead of the show.
Check yourself
Lesson complete. On to lesson 5.
Completed
Lesson 5 of 10
Mounting and the beam block
Where the cube sits decides where its beams can go. Mount it firmly, aim it, then set the beam block so no beam can reach people.
Mount it so it can’t move
- Secure the cube before you use it, so the beam can’t shift by accident. Lock the tilt with the screws on the bracket.
- On a truss or stand, pick a clamp whose rating covers the cube’s weight, and tighten it until neither gravity nor speaker vibration can tip the cube’s angle.
- For any rigging overhead, run a safety cable through the safety eye bolt.
- Handle it as precision equipment: some parts are fragile, so protect it from knocks and drops.
- Leave open space on all sides so air can flow through the heat sink underneath, and run it between 10 °C (50 °F) and 40 °C (104 °F).
Set the beam block
The beam block is your hard stop: whatever the software does, the beam can’t get past it. Set it like this:
- Switch the cube off and take the key out.
- Aim the cube and lock it in place.
- Adjust the beam block, then lock it with the screws on either side.
- Switch on and project a full‑size test image at low brightness (the cube’s RGB‑THold test pattern shows the edge of the projection area). Check where the beams go.
- Repeat until no beam can scan into any audience area, and every beam stays at least 3 m (10 ft) above people.
If the built‑in block can’t mask an angle you need, fix a piece of black foil (cinefoil) to the cube at the edge of the aperture, clear of the vents. Gaffer tape on its own is no beam block: a laser cuts right through it.
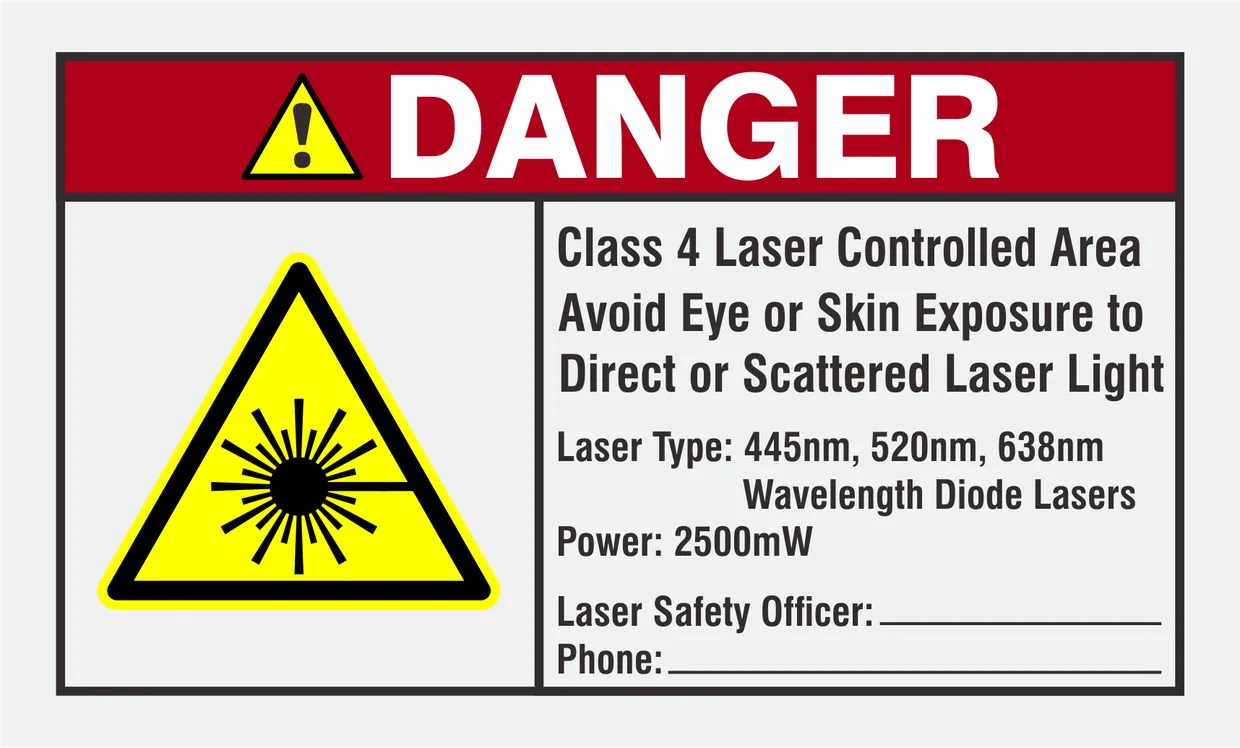
Put up warning signs
Place laser warning signs in and around the venue, especially where the audience can go.
Check yourself
Put the beam block steps in the right order.
- Switch the cube off and take the key out
- Aim the cube and lock it in place
- Adjust and lock the beam block
- Switch on and check where the beams go
- Repeat until no beam reaches the audience
Adjust with the power off and the key out, then check with the power on. Repeat until nothing scans into the audience.
In the manual: Hardware installation·Test patterns
Lesson complete. On to lesson 6.
Completed
Lesson 6 of 10
Key, interlock and E‑Stop
The laser only emits when the interlock is closed and the key is on. Know how to stop it instantly before you ever start it.
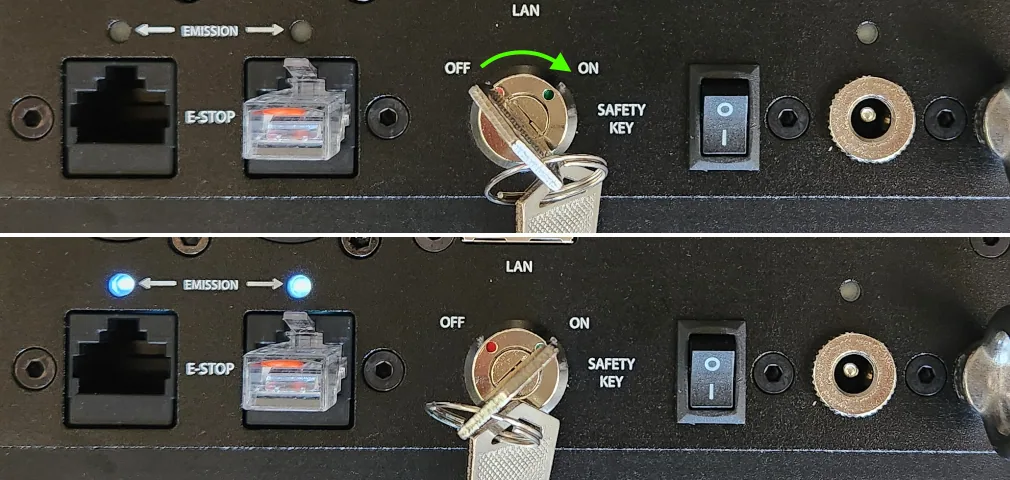
Outside the US: the safety jumper
- Plug the safety jumper into one of the two E‑STOP ports.
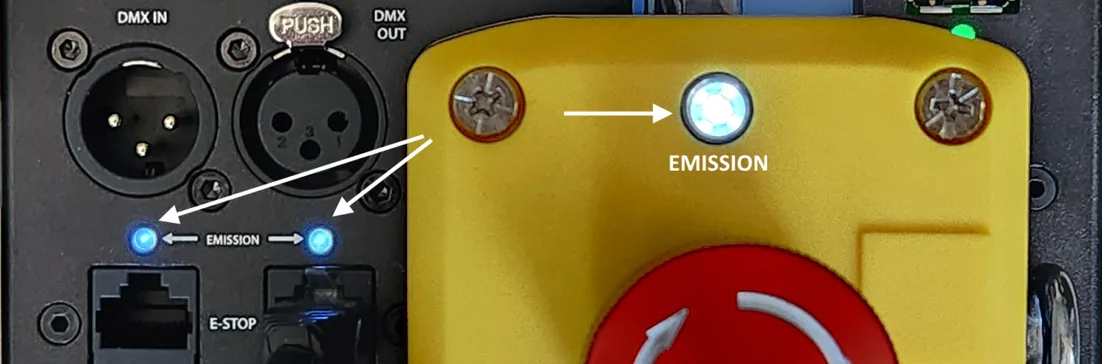
- Insert the safety key and turn it from OFF to ON. The EMISSION LEDs light up: the cube can now emit laser light.
- To stop emission, turn the key from ON to OFF and take it out.
In the US: the E‑Stop
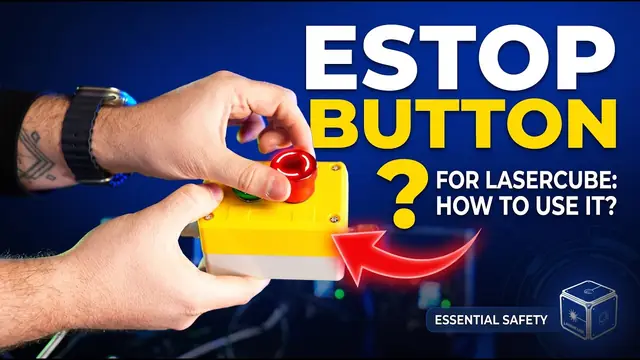
US cubes come without the jumper. They must run with the E‑Stop that comes with them (an FDA requirement), and the laser won’t work without it.
- Connect the E‑Stop pendant to the cube.
- Turn the key on the cube to ON.
- If the red STOP button is pushed in, turn it clockwise until it pops up.
- Turn the key on the pendant clockwise to ON. The EMISSION LEDs flash slowly, once every 3 seconds.
- After the second flash, briefly press the green START button. The LEDs flash once a second; after 10 seconds they stay on and the laser can emit.
Always have two ways to stop
Set up every show so you have a main and a backup way to stop the laser instantly, for example the E‑Stop and the key, and keep both within reach. Before the show, check that they really stop it.
After a power loss, or after the interlock has been opened and closed again, the laser won’t start by itself: the key (and on US cubes the E‑Stop start sequence) has to be reset first. That’s on purpose, so a cube never fires the moment power comes back.
Check yourself
Put the US E‑Stop start‑up in the right order.
- Connect the E‑Stop pendant to the cube
- Turn the key on the cube to ON
- Raise the red STOP button (turn it clockwise)
- Turn the key on the pendant to ON
- After the second slow flash, press START briefly
After START the LEDs flash faster, then stay on after 10 seconds: the laser can now emit.
In the manual: E‑Stop / interlock·E‑Stop setup guide (US)
Lesson complete. On to lesson 7.
Completed
Lesson 7 of 10
Switch on and connect LaserOS
Now switch the cube on, find your way around CubeOS on its screen, and connect LaserOS.
Power and CubeOS
- Charge through the 19V DC input. The charging LED is red while charging and green when full.
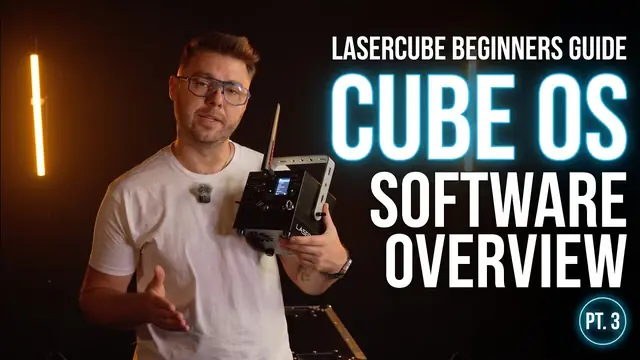
- Turn the cube on with the power switch. The LCD shows CubeOS: turn and push the rotary knob to move through the menus.
- The status bar at the bottom of the screen shows important messages and warnings.
Connect LaserOS over WiFi
- On the cube, choose Control Mode → LaserOS.
- Choose Settings → Connection → WiFi server. Changing the connection mode restarts the cube: select YES and push the knob.
- On your phone or computer, join the cube’s WiFi. By default it’s called LaserCube and the password is Laser2020. You can change both under Settings → Network → WiFi Server.
- Open LaserOS. It finds the connected cube.
- With the jumper or E‑Stop in and the key on (lesson 6), turn the laser on from LaserOS’s power menu. On a computer, the ESC key turns it off again.
When WiFi isn’t good enough
- Use the WiFi scan button in the WiFi server settings to see how busy the 2.4GHz channels are. If they’re congested, use a cable.
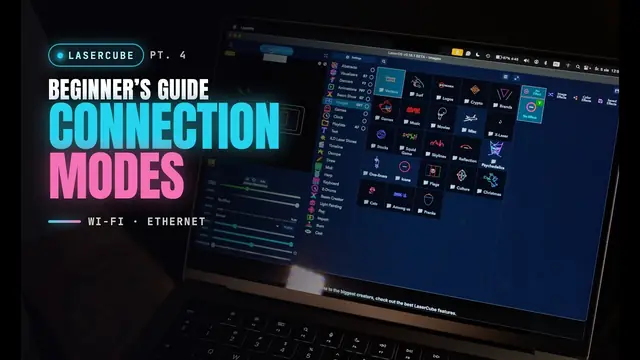
- For several cubes, or where WiFi is busy, the manual recommends a network cable in LAN client mode. Without a router, the cube gives itself an address starting 169.254 (APIPA).
- Get LaserOS for Windows or Mac from laseros.com. The phone apps stream to the cube; putting content on its SD card needs the computer version.
Check yourself
Put the steps for your first WiFi stream in order.
- Turn the cube on
- Choose Control Mode → LaserOS
- Choose Settings → Connection → WiFi server
- Join the LaserCube WiFi on your phone or computer
- Open LaserOS and turn the laser on
Connect your device to the cube first; LaserOS then finds it. The jumper or E‑Stop must be in and the key on.
In the manual: LaserOS control mode·Connection settings
Lesson complete. On to lesson 8.
Completed
Lesson 8 of 10
Safety zones
A safety zone limits where the cube’s beams go at full power. Use it on top of the beam block and the 3 m rule, never instead of them.
Keep‑within and keep‑out
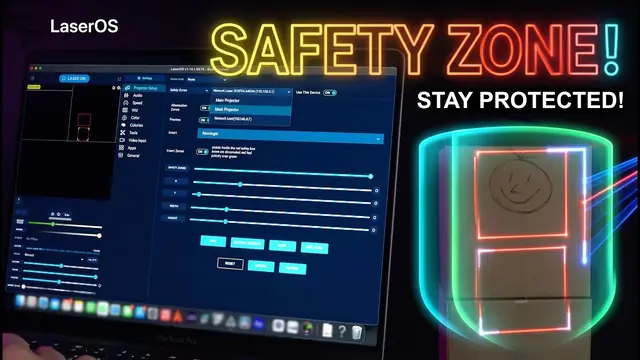
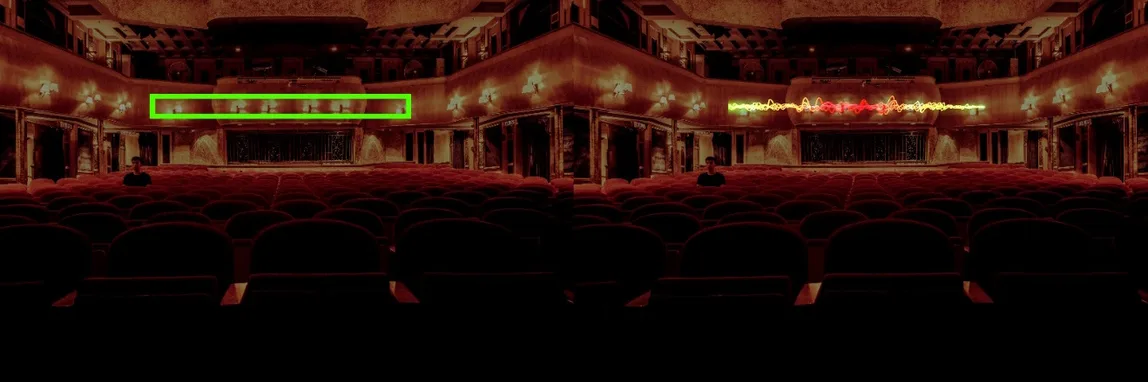
- A keep‑within zone (the default) marks where beams may go. Its preview outline is green. Use it for the target area where beams can safely end.
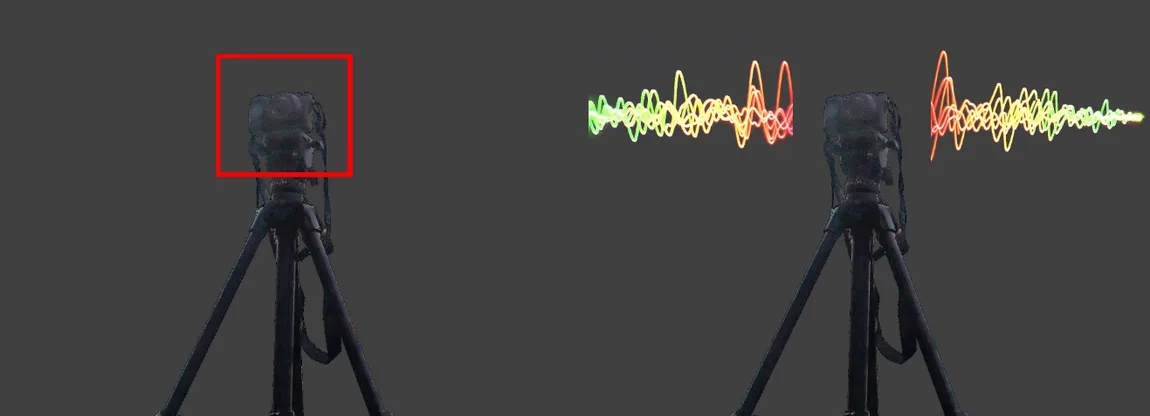
- Turn on invert and it becomes a keep‑out zone, with a red preview outline. Use it to keep beams off something, such as a camera or a video projector.
- The zone can be a rectangle, circle or ellipse; sliders set its size and position.
- Attenuation sets what happens to beams outside a keep‑within zone, or inside a keep‑out zone: 100% blanks them completely; 90% cuts them to 10% of their normal power.
- The preview toggle projects the zone’s outline (the interlock has to be enabled).
Where you set it
In LaserOS control mode, LaserOS handles the safety zone, so the CubeOS entries are greyed out. In the cube’s own modes, such as Visualizer, set it on the cube under Settings → Projection → Safety Zone.
Check yourself
In the manual: Safety zone·Projection settings
Lesson complete. On to lesson 9.
Completed
Lesson 9 of 10
If something goes wrong
Know what to do before you need it: if a beam hits someone, if the cube is damaged, and which rules apply where you are.
If a beam hits someone
- Stop the laser with the E‑Stop or the key.
- Get medical help right away. For any beam in the eye, see a doctor straight away, even if it seems fine.
- Note it all down while it’s fresh: when it happened, which cube, how far the person was from it, which colours and pattern were playing, about how long the beam hit them, and photos showing the room and where the cube stood.
- Email support@laseros.com with those details.
In the US: also tell X‑Laser (info@x‑laser.com). An accidental exposure can be reported to the FDA on its form 3649.
If the cube is damaged
- If you think it’s damaged or faulty, don’t use it, and never open it. Email support@laseros.com.
- If it smokes or smells of burning: switch it off, unplug it, keep it away from anything flammable, don’t use it again, and email support@laseros.com.
The law where you are
It’s your job to know the rules where you use the cube. Laws vary: some places need extra licensing or registration, and many only allow laser shows under the supervision of a trained Laser Safety Officer (LSO).
In the US: an FDA variance is required to operate a LaserCube. A LaserCube bought in the USA comes with this variance, issued by X‑Laser. Keep a copy of it at every show.
If you see a laser show that looks unsafe, tell the venue and the company running it. In the US you can also report it to the FDA.
Check yourself
A beam has hit someone in the eye. Put the steps in order.
- Stop the laser
- Get them to a doctor right away
- Write down what happened and take photos
- Email support@laseros.com
Stop the laser and get medical help first; the details and the email come after.
In the manual: Safety guidelines (11, 12, 17)
Lesson complete. One lesson to go.
Completed
Lesson 10 of 10
Before every show
Run through this list before every show. It’s everything from the earlier lessons, in the order you’ll need it.
Pre‑show checklist
- Cube undamaged, labels on and readable, EMISSION LEDs working and uncovered.
- Aperture window clean. Only with the cube off and the key out: a dry tissue that leaves no lint.
- Local rules checked. Licence, registration or a Laser Safety Officer where required. In the US: a copy of the FDA variance with you.
- Mounted so it can’t move. Rated clamp, tilt locked, safety cable through the eye bolt for anything overhead.
- Open space around the cube. Air flows through the heat sink underneath; 10–40 °C (50–104 °F).
- Every beam ends on something solid that doesn’t reflect or burn. None into the open sky.
- Beams at least 3 m (10 ft) above the highest place people can stand. Safe and restricted areas with a 3 m buffer; no audience scanning.
- Nothing in the beam area that reflects, burns or has a lens. Mirrors, glass, chrome, pyrotechnics, cameras, video projectors.
- Beam block set and locked; safety zones set.
- Laser warning signs up where the audience can go.
- Jumper or E‑Stop connected; two ways to stop tested and within reach.
- Every beam and where it ends is in view. A second person with their own stop for anything you can’t see.
- Nobody untrained or underage at the controls; the laser is never left running unattended.
- After the show: key off and out, cube out of reach.
Would you run this show?
Six situations. Decide, then read why.
A house party. The cube sits on a table at chest height and sweeps beams across the room where people are dancing.
Beams must stay at least 3 m above people, and the LaserCube is never for audience scanning. Mount it higher and set the beam block first.
A club. The cube is clamped to a truss 4 m up with a safety cable, the beam block keeps every beam 3 m above the dance floor, beams end on a concrete wall, signs are up, the E‑Stop is in your hand and you’ve checked the local rules.
Secured, cabled, beams above 3 m and ending on a safe surface, signs up, a stop at hand and the rules checked. That’s a safe setup.
A garden party at night. For big beams, you point them straight up into the open sky.
Never let beams go into the open sky: they can dazzle or blind pilots miles away. Beams must end on something solid.
A wedding with a mirrored wall behind the dance floor. Your beams land on the mirror.
A mirror sends beams back toward people. Beams must end on something that doesn’t reflect.
A friend’s 12‑year‑old asks to run the show from LaserOS on their phone while you get a drink.
Keep the cube away from children and anyone untrained, and never leave a running laser unattended.
Your cube fell off a table yesterday. It still switches on, but something rattles inside.
Don’t use a cube you think is damaged, and never open it. Email support@laseros.com.
All lessons done. The final quiz is open.
Final quiz
Final quiz
10 questions from the whole course, picked at random. Get 8 right to pass. You can try as many times as you like.
Finish all ten lessons first. Still to do:
Certificate
Your certificate
Pass the final quiz to get your certificate. Go to the final quiz
Well done. Type your name as you want it on the certificate.
Your certificate is made right here in your browser. Your name isn’t sent anywhere; it’s only kept in this browser.
This is a certificate of completion. It is not a licence, a Laser Safety Officer (LSO) qualification or permission to run public laser shows. Keep the pre‑show checklist handy.