Test
Mk2 Settings – Network
LAN Client Mode
For multiple laser cubes and especially in areas where local WiFi may be congested, this is the recommended connection mode. When connected to a network without a DHCP server, the Lasercubes will self-assign APIPA addresses.
LAN Client Mode Customisations:
IP (Address) Mode - Auto IP / Static IP
Auto mode. Uses DHCP server if present, or AIPIPA.
Static IP. Manual configuration of IP Address, Net Mask and Gateway
File:Lu612803hseqz tmp a6f2d637.png File:Lu612803hseqz tmp 62e83824.png File:Lu612803hseqz tmp 35799b1b.png File:Lu612803hseqz tmp 76342e69.png To enter the IP address, short press with the entry box highlighted.
Select the tick button to close the entry box.
The gateway address and subnet mask can be edited in the same way.
File:Lu612803hseqz tmp 70e1086e.png File:Lu612803hseqz tmp 9102ba06.png
LAN Server Mode
This is not recommended, and in most cases LAN Client Mode’s AIPIPA will be far easier to implement, however it is retained for most flexibility.
LAN Server Mode Customisations:
Manual configuration of IP Address and Net Mask
File:Lu612803hseqz tmp 45f0cd0.png
WiFi Server Mode
Useful for cable free, single cube LaserOS operation in areas with no WiFi congestion.
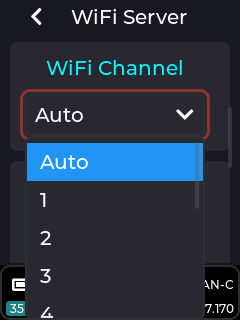
Note: Make sure you connect the provided WiFi Antenna before using any wireless modes. It is preferable to leave the WiFI channel set to Auto, which will make the device scan for the quietest WiFI channel to use at each power on of the device.
WiFi Server Mode Customisations:
SSID, Password, Channel (including Auto), Bandwidth, IP Address, Net Mask
File:Lu612803hseqz tmp a98068c.png File:Lu612803hseqz tmp c81b5c7a.png File:Lu612803hseqz tmp 57171006.png File:Lu612803hseqz tmp e4904c62.png File:Lu612803hseqz tmp 2613e951.png
WiFi Client Mode
For connecting to an existing WiFi router. Performance may vary depending on the quality of the router, amount of WiFi congestion and the amount of existing network traffic.
Note: Make sure you connect the provided WiFi Antenna before using any wireless modes.
WiFi Client Mode Customisations:
SSID, Password, IP Mode - Auto / Static (IP Address, Gateway, Net Mask)
File:Lu612803hseqz tmp 6671c9a9.png File:Lu612803hseqz tmp 599e2c16.png File:Lu612803hseqz tmp 990d5dcc.png File:Lu612803hseqz tmp c6a3ea71.png File:Lu612803hseqz tmp 996cebe9.png File:Lu612803hseqz tmp 772b2b8.png To enter the IP address, short press with the entry box highlighted.
Select the tick button to close the entry box.
Cube Link Mode
Wireless Cube Link (only available when connection mode is not set to WiFi) is a method of synchronising playback of content across multiple Mk2 Lasercubes. Cube Link does not require a WiFI network to be present as it creates its own wireless network to communicate between master and slave devices within ~20-40m line-of-sight range using a low data rate communication protocol.
Note: Make sure you connect the provided WiFi Antenna before using any wireless modes. In order to set up a Cube Link network, it must be enabled on each Mk2 Lasercube, then one Mk2 Lasercube must be set to Master, and the other Mk2 Lasercubes as Slaves. To exist on the same Cube Link Network, they must all share the same Link Channel and Link Pin. The Group determines what content that particular Mk2 Lasercube will project. For a 2 projector Lasershow, the first projector content will be shown on all Mk2 Lasercubes set to Group 1 and the second projector content will be shown on all Mk2 Lasercubes set to group 2.
Slave devices that are in range of a Master that have a matching channel and pin configuration will be indicated by the status bar background on each slave turning from black to purple.
File:Lu612803hseqz tmp 6ee4c13e.png
Cube Link Mode Customisations:
Enable, Master/Slave, Link Channel, PIN, Group
File:Lu612803hseqz tmp 8a34d6f2.png File:Lu612803hseqz tmp 69617b4b.png File:Lu612803hseqz tmp d1e60984.png File:Lu612803hseqz tmp 55370281.png File:Lu612803hseqz tmp 9b4ccd0f.png To set the PIN, either use the + and – buttons to increase / decrease the selected digit, highlighted in blue, or short press with the PIN entry box highlighted.
When in the PIN entry box:
Short press to change the highlighted digit.
Rotate the knob to increase/decrease the highlighted digit
Long press to exit the PIN entry box.


