UltraMk2FM: Difference between revisions
No edit summary |
No edit summary |
||
| Line 139: | Line 139: | ||
23. Safety Eye Bolt. When mounted at height, attach safety cable through the eye. | 23. Safety Eye Bolt. When mounted at height, attach safety cable through the eye. | ||
[[File:Pasted image 20250416185603.png]] | |||
Revision as of 15:39, 18 April 2025
- The World’s Smallest Laser Display**
- Owner’s Manual and User Guide**
LaserDock Ltd. strongly recommends keeping this manual with your new laser projector at all times as a field reference.
- WARNING!**
- LASER RADIATION**
- AVOID EYE OR SKIN EXPOSURE TO**
- DIRECT OR SCATTERED RADIATION**
- CLASS 4 LASER PRODUCT**
- BEFORE USING THIS PRODUCT, READ AND FOLLOW ALL NOTICES AND SAFETY INFORMATION THROUGHOUT THIS GUIDE.**
- THIS LASER PRODUCT IS NOT TO BE USED OUTDOORS**
- Some US states require additional licensing and/or registration. Many locations require operation only under the supervision of a trained Laser Safety Officer (LSO).**
12/F, San Toi Building, 137-139
Connaught Road Central, Hong Kong
Email: support@laseros.com If you have any questions about any of the content of this manual
or the safe operation of your new laser projector, please do not hesitate
to contact LaserDock Ltd. directly.
Table of Content
1. Introduction
2. LaserCube Ultra Mk2 Parts Diagram
3. Technical Specifications
4. Product Labeling and Placement
5. Safety Guidelines and Proper Usage
6. LaserCube Setup Guide
7. E-Stop Setup Guide
8. LaserCube Web Admin Page
9. Firmware Update
10. Installation
1. Introduction ________________________________________
Visuals play a huge role in the sensory experience of music. The synergy of lasers, lights, screens and strobes are why we go to clubs and festivals. The Ultra Mk2 is a radical leap forward in Laser Projection Technology, embedding CubeOS into the very heart of each unit for exceptional stand-alone capabilities. We’ve thrown in blood, sweat, tears, and every ounce of our techical knowledge to create something truly remarkable.
The LaserCube combines a portable laser projector, music visualizer and laser show software. Just connect a Mac, PC, iOS or Android device and that’s it. With its compact size, bring the party everywhere with you.
With the easy-to-use LaserOS projector software, enjoy laser shows, games, clocks, social media, projection mapping and more...
“Caution – use of controls or adjustments or performance of procedures other than those specified herein may result in hazardous radiation exposure.
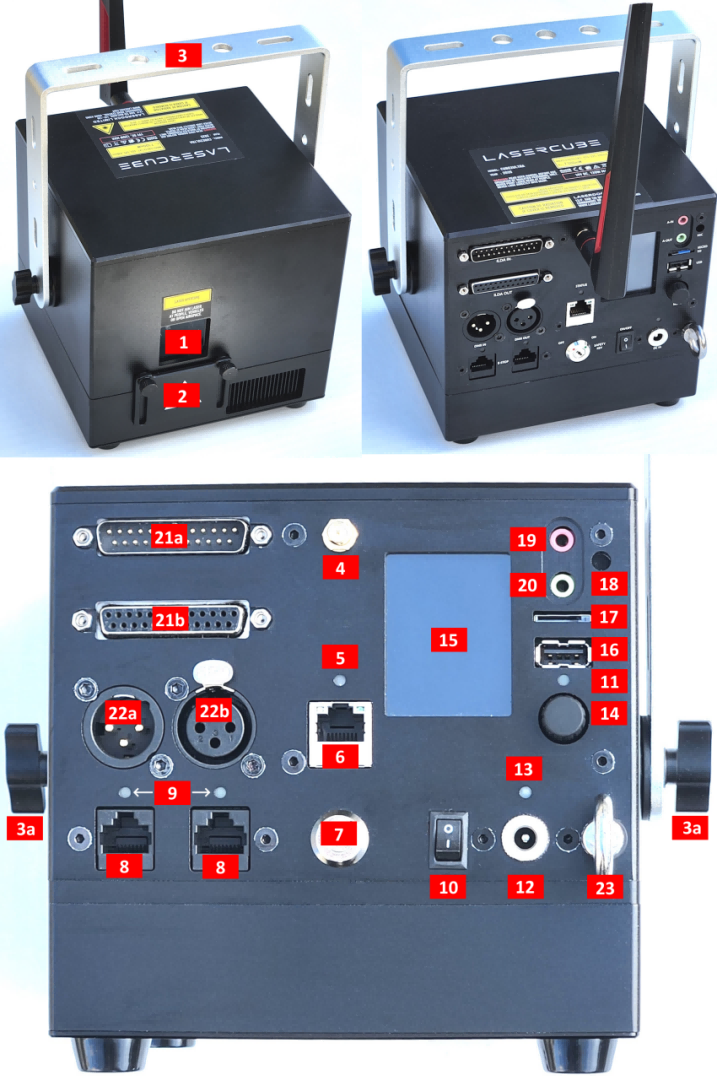
2. LaserCube Parts Diagram
1. Laser Aperture - Laser light is emitted from this opening.
2. Beam Block - Prevents laser emission and also restricts the laser scan from going into an audience. Can be locked using the screws either side.
3. Mounting Bracket for secture installation. Tilt may be locked using Screws 3a
4. WiFi Antenna Connector - to facilitate wireless connection.
5. Status LED for showing Connection Mode.
6. RJ-45 Ethernet Port for cable connection to network.
7. Safety Key Control - Prevents accidental operation. Resetting of the key control will be required if there is a power loss or remote interlock cycling.
8. RJ45 Remote Interlock Connectors - In/Through. Provides a safety shut-off for terminating the laser emission via a jumper connection. _A jumper is included with the product_.* Do not attach Ethernet devices to these connectors.
*__For the_ **_US LaserCube_** _model, the jumper is not included. It is required to be operated with an E-Stop for FDA compliance and will not work with only the safety jumper installed
9. Emission LEDs. Indicate when the Laser is emitting or ready to emit.
10. Power Switch - Toggles the power ON or OFF.
11. Power LED. Indicates when the Power Switch is ON.
12. Power (19V DC) Input - Power connection/charging port via wall outlet.
13. Charging Status LED indicator - Red = Charging, Green = Fully Charged
14. Rotary / Push Menu Knob - Navigate Cube OS and adjust settings.
15. LCD Display for CubeOS.
16. USB Port. Connect a USB MIDI devide such as the APC40
17. MicroSD Card slot. Stores content for MIDI, ArtNet, DMX and Stand Alone mode.
18. Internal Microphone. Audio input source for built-in visualisers.
19. 3.5mm Audio Line Input - Audio input source for built-in visualisers
20. 3.5mm Audio Line Output - Audio Lasershow output to powered speakers.
21. ILDA Ports (In/Out)
21a. ILDA Input Connector - DB25 Male:** The Lasercube will automatically change from the internal LaserOS DAC to an external ILDA compatible DAC if connected to this port.
In the settings for the software that accompanies the external DAC, we suggest configuring the scan rate to 30000 points per second.
21b. ILDA Output Connector - DB25 Female:** Duplicate of the internal LaserOS DAC signals, of those of an external DAC when connected to the ILDA input.
22. DMX connectors (In/Out) - connect to a lighting desk / controller
22a DMX Input
22b DMX Output
23. Safety Eye Bolt. When mounted at height, attach safety cable through the eye.

